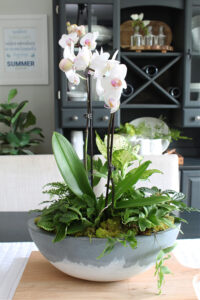
Create a pretty DIY orchid planter with this simple tutorial. It makes the perfect centerpiece or accent piece for your summer decor!
Summer Seasonal Simplicity Series
Today kicks off the Summer Seasonal Simplicity Series! For the next several weeks, we’ll be sharing tons of summer ideas with you to help inspire you for the season! From DIY ideas and summer home tours to delicious summer recipes and pretty outdoor spaces, there’s something for everyone. We’re starting things off today with some simple summer DIY projects, so be sure to check them all out at the end of the post.
Orchid Centerpiece Summer Decor
I always like to include some live greenery in our summer decor, and I love the look and diversity of tropical plants. As an added bonus, they’re pretty easy to care for even in the warmer summer months! I made a tropical centerpiece for our kitchen table a couple of years ago, and thought I would take it up a notch this year and add in an orchid. I love how it turned out and I think it would make a great addition to any summer decor!
NOTE: This post contains affiliate links. This means that I may make a small commission off items purchased directly through the links provided. Thanks for your support!
DIY Orchid Planter
Materials
- planter or container of your choice. If your container doesn’t have drainage holes, you will also need small rocks to place in the bottom of the container for drainage (these can be purchased at the dollar store).
- orchid
- a variety of tropical plants and/or ferns. Look for different heights, textures, and coloring. I used 5 different plants for mine.
- potting soil
- moss {I like the brighter reindeer moss}
- wood pieces, decorative rocks, or other add-ons for extra texture and interest
Instructions
- If your planter has drainage holes, just place a light layer of soil in the bottom of the planter. For containers without drainage holes, fill the bottom with small rocks for drainage and then add the soil over top.
- Add the orchid to the center of the planter. Make sure you keep the orchid in its original plastic container. You can always trim the top down a bit if it’s showing through. The original container should have an orchid-friendly potting mix {typically a mix of gravel, plant-dried fibers, bark and other chunky components} that allow for more air flow around the orchid’s roots. Keeping the orchid in the original container will also allow you to water your orchids separately in case they don’t require the same amount of water as your other fillers.
- Add the plants and move them around to get the look you want. Plants are said to have a “face” so move them around to put their best face forward! Start with the largest ones first and then move to the smaller ones. Once you’re happy with it, take them out of their pots and slightly break up the roots before placing them back in your planter.
- Fill in around the plants with more soil. Top with moss, decorative rocks, or other decorative embellishments if desired.
Orchid Planter Care Tips
- Most orchids require bright, indirect light, so choose filler plants that like the same lighting conditions.
- Place your orchid planter in or near a bright window {ideally facing east or west}. Avoid suddenly moving the plant’s location.
- When you’re choosing your orchids, look for rich, green healthy leaves and at least a few buds that still need to open.
- Orchids do not require a lot of water so DO NOT OVER WATER! Approximately 1/4 cup of water every week is generally all they need, although they may require a little more or less depending on the temperature. Before watering, press a finger down into the potting soil and only water if it is dry to touch.
- Keep the orchid in the original plastic container when planting so you can water them separately from the tropical plants.
- When your orchid leaves drop, you can simply remove the orchid container and replace with a new one {or add another tropical plant or focal flower}. You can repot the old orchid too if you like. If you continue to water it and give it light, it will bloom again after being dormant for several months. It may not look healthy, but it’s just in its natural dormant state. I’m not typically patient enough for this but it will work!
- Orchids typically like temperatures between 65 and 85 degrees Fahrenheit and a humid environment.
I hope you give this simple planter a try! I’d love to see what you create.
More Summer DIY Ideas
For more beautiful summer DIY ideas, check out these posts from my blogging friends. Just click on the link below the photos to go directly to the posts!
DIY Faux Clay Textured Vase at The Happy Housie
DIY Outdoor Foot Washing Station at Grace in My Space
How to Make Beach Glass at Dans Le Lakehouse
Summer Estate Sale Stool Makeover at Confessions of a Serial DIYer
DIY Tapestry at My Sweet Savannah
DIY Patriotic Door Basket at She Gave it a Go
Two Easy Patriotic Pillow Covers at Tatertots and Jello
DIY Orchid Planter at Clean & Scentsible
The post DIY Orchid Planter appeared first on Clean and Scentsible.
source https://www.cleanandscentsible.com/diy-orchid-planter/

No comments:
Post a Comment