This blogging thing is really getting to me! In a GOOD way, of course. :-) After over a year of researching and surfing and pinning different DIY projects, I finally decided to tackle a somewhat significant project in my house. Once I saw this tutorial from Monica Wants It and realized just how much my own bathroom cabinets needed a makeover, I decided to take the plunge!
And while the project wasn’t what I would call easy, it really particularly HARD either. And all that effort was definitely worth it, because I’m giddy over how well it turned out!
Why A DIY Vanity?
Houzz.com put it perfectly when they said:
Not only can DIY save you cash at times, but it can help to save the planet through recycling and upcycling. Creating and making things yourself also gives you a sense of pride and defines your personal style – it allows you to stand out from the crowd and decorate a home that is not like everyone else’s.
Even if you’re not doing a full bathroom renovation, replacing anything in your bathroom can get pretty pricy. Not everyone has the budget to buy their favorite bathroom vanity and brand new fixtures. But even a relatively simple DIY can make a big difference, and it’s SO MUCH LESS EXPENSIVE!
Instead of buying a new vanity for $1200, you can update your existing one for about $100 in supplies and a few hours of your time! And all things considered, updating the look of your bathroom vanity is a pretty low-risk project to take on—if a newbie like me can handle it, anyone can! ;-)
And even as fantastic as a new store bought bathroom cabinet can be, nothing is perfect. Eventually, there will be something about it that makes you think, “If only this had…”

My Bathroom Vanity Makeover
I must send out major props to Monica at Monica Wants It for her tutorial on staining oak cabinets. I was immediately intrigued by her project, because my bathroom cabinets looked eerily similar to the ones in her “before” photos. After reading her tutorial, I was hopeful that I could wind up with similar results to her “after” photos too!
And since I am such a neophyte at DIY projects, I followed her instructions pretty closely, but with a couple of small changes. I assume this is farily typical, because no two projects are alike, right? (I’m just guessing here.) :-)
So here’s an overview of what I did, in hopes that it will help you if you decide to attempt this DIY project in your own bathroom!

Bathroom Hardware
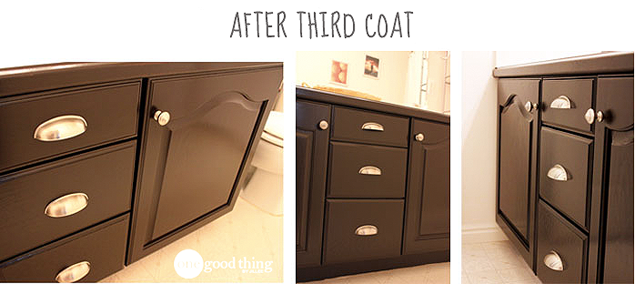
Hardware can really date your cabinet, and it’s one of the first things you’ll want to replace. So before I started anything else, I bought new knobs and drawer pulls for my vanity.
When you are removing the old hardware from the doors and drawer fronts, put everything in a bag or a box and HOLD ONTO IT until the project is finished. You can even go a step further and tape the bag somewhere safe (like the inside of one of the cupboards.)
You will obviously need the interior hinges when it’s time to reattach the doors, but the screws and other hardware can come in handy too. The screws that came with the new Martha Stewart Collection handles I bought for the drawers turned out to be too short, but since I kept all the original hardware, I was able to reuse the old screws.
Even if you aren’t planning to replace any of your hardware, it’s still a good idea to take them off to avoid getting paint on them. If the hardware just won’t budge, you can use painter’s tape and “press and seal” wrap to protect it during the painting process.
I also recommend removing the slides off of the drawer box and from the inside of the cabinet as well. It’s a lot easier that way (especially if spraying is involved), but it’s not an absolute necessity. If you don’t remove them, make sure to cover each drawer slide with painter’s tape, otherwise you’ll wind up with a gunky drawer that get’s stuck all the time!
Just remember, the more thorough and careful you during the prep stage, the better your finished product will turn out!
Fixing Damage
With any luck, you won’t need to fix anything. But structural damage should certainly be fixed, and the “distressed” look won’t always be in vogue! You can usually buy replacement cabinet doors, but if you want a different style to replace ones that are beyond repair, you can make your own with a bit of plywood, brads, wood glue, and pocket holes to give your cabinet a modern feel.

Sanding
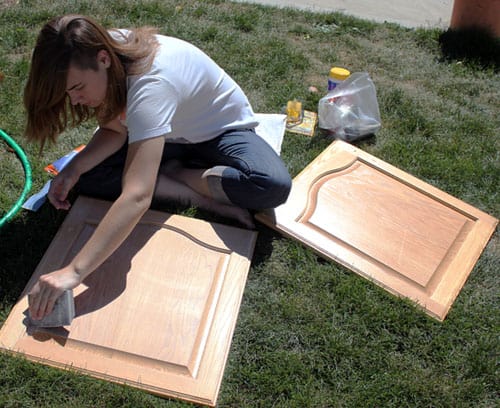
All store bought bathroom vanities have a thin protective coat on the wood. This coat has to be sanded for two reasons. First, because you need to expose the porous nature of the wood in order for the stain to soak into the wood.
Second, if you are using paint, it will adhere better to a rough and porous surface. The slick surface of the protective layer is too slippery and if you paint directly over it, the paint will easily peel off over time. Cabinet doors that are constantly being touched are especially vulnerable, and we don’t want that!
While sanding is important here, it doesn’t actually take too much time or effort. Using a sanding block is a BIG HELP, and I definitely recommend using one!

Staining Your Vanity
The tutorial I followed suggests using a men’s athletic sock over a vinyl glove to apply the stain. I tried this and it just didn’t work for me. I eventually switched to foam brushes and much preferred doing it that way.
You can make things easy on yourself by buying several foam brushes in various sizes so you can just throw them away as they start to fall apart. Even if you’re working carefully, those foam brushes will start to fall apart on you if you use them more than two or three times.

Speaking of stain, I used the same General Finishes Java Gel Stain that Monica recommended, and I absolutely LOVE how the color turned out in the end! I bought the quart-sized can, but you could easily get by with a half-pint can for a project like this. A little goes a LONG way!

Before I applied the polyacrylic topcoat I went over any little areas that the stain hadn’t quite covered entirely and filled it in with a Black Sharpie. (A little trick from the hubster!) If I didn’t know where I’d used the Sharpie…I would never be able to tell.

Another thing I found useful during the staining process was allowing LOTS OF DRYING TIME in between coats. This is pretty important to the overall success of this project.
However, I found that I didn’t have to allow much time at all between coats of the polyacrylic topcoat. It dries surprisingly fast, so I applied 3 coats in pretty close succession without any problems. Just make sure each coat is thin and even, and with the help of a few Painter’s Pyramids, you won’t have to wait for the first side dry to paint the other side (a BIG timesaver!)
That’s pretty much all I got folks! I hope you will check out Monica’s blog and tutorial. She obviously put a LOT of work into the tutorial and I am just SO pleased with the results I was able to achieve by following it.
Miss Britta got the project ball rolling by taking off the doors and sanding. Thanks sweetie! :-)

Looking better…

You know what they say—the third coat’s the charm!
Before And After Photos


I almost can’t believe I did that! :-)
Final Thoughts And Impressions
I’m really very pleased with how my cabinets turned out and would recommend this project to anyone! I think it’s a good project for “first timers” like myself. It was definitely a confidence booster, and I learned a lot and can’t wait to start on MY bathroom next. (I certainly have enough leftover stain to do it!)
UPDATE 8/29/14: I did indeed update my bathroom cabinets with the same method a few weeks after I wrote this post, and was once again thrilled with the results! I’m also pleased to report that two years later, my cabinets still look just as good!

No comments:
Post a Comment